This page addresses painting the figure. You don't do it all at once. You must do some of the painting before assembly, some during, and some after. The individual construction pages tell you when you have to paint something and refer to this page for the details. Chapter 8 of
Figure Making Can Be Fun
includes a detailed discussion of figure painting in general.
Mixing Paint
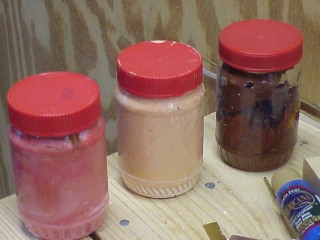
You have three different paints to mix, the flesh tone for the face, hands and feet, a brownish mixture for the eye rims and eyebrows, and a red tone for the lips, gums and tongue. Mix each of these colors in advance and store them in sealable containers. Mix more than you need for this project and make sure it's stored in airtight containers. Make sure, too, that you wipe the lids and container rims clean before you close the containers so the lids don't seal closed when the paint dries.
You won't use all the paint of any color at one setting and you want to keep some of each color over the years so you can touch up your figure as it wears with use. Someday, too, it will need repainting.
I use only acrylic artists paint for these projects. It dries fast and cleans up with soap and water, and you can thin it with water.
If you use the tubed artist's acrylic paints, dilute the mixed paint with water after you have the color you want. You want the consistency of cream. Thicker acrylic paint does not bond well to the urethane casting medium of Fred's head, hands and feet.
Sand all urethane surfaces with 100 grit sandpaper before painting. Clean the part after sanding and before painting with dishwashing detergent and water. Let it dry thoroughly.
If you are using acrylic paint, do not use primer of any kind. Acrylic paint does not adhere well to primers.
For any of these colors, when you think you have the mix you want, paint some on a sanded surface, seal the mixed jar of paint, and wait for the paint to dry. The color is slightly different when the paint has dried flat. Spray the test sample with clear matte finish acrylic sealer. If the color is not what you want, open the container and do some more mixing.
I won't try to show examples, because digital photography and color displays are imperfect. The best thing for you to do is find a figure that looks the way you want yours to look and mix your paints to achieve those tones.
Flesh Tones
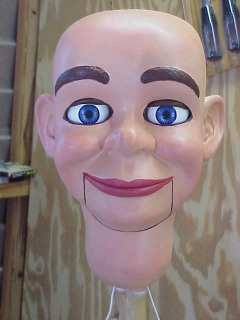
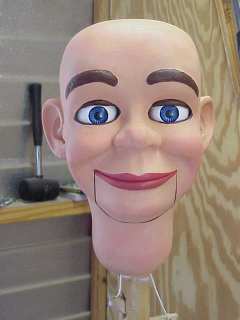
There are many different flesh tone mixtures for ventriloquist figures. Every figure maker has his or her own preferred mixture. Fred is a Caucasion boy, and there are many choices for this mix.
The two main ingredients for a Caucasian flesh tone are white and Burnt Sienna. Start with a lot of white and add Burnt Sienna, mixing it in until you get the tone you prefer. If you like the orange effect that Frank Marshall got, mix in lots of Naples Yellow. This color was considered ideal for the bright lighting of a stage performance and showed up well on television, too.
You can add red to get more of a blush, but that might be premature. Later, you'll add highlights to the painted face and hands, and the blush is not needed before that.
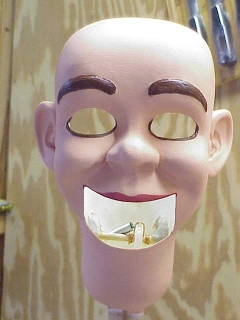
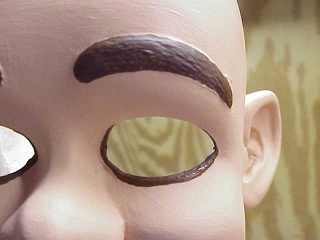
Eyebrows and Eye Rims
Usually these are brown. A mix of Burnt Sienna and a darker brown should provide a shade you will like. Even a figure with blonde hair should have brown eyebrows and eye rims so they stand out to an audience.
Lips, Gums, Tongue
Some people like to use pink, some like dark red, some like other things. I like the color that comes on the Jerry Mahoney replica figures and strive to match that tone. It involves a mix of Cadmium Red Deep, Cadmium Red Light, Burnt Sienna and white. I don't know the ratios; I just keep mixing colors in until I get the tone I prefer. I have a jarful of it now, enough for all the figures I'm likely to make in the next few years. I didn't plan it that way. I just kept adding paint and mixing until I saw what I wanted. By then it was a jarful.
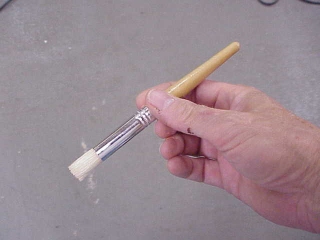
For adding the last coat of flesh tone and blending highlight into the face, I use a stippling brush. The only thing is, if you ask a clerk in a craft store for a stippling brush, you are met with a blank stare. If you ask a clerk in a paint store you get something too big that they use to add a textured effect to plastered walls.
A stippling brush looks like this. It's bristles are flattened on the bottom with a round shape. Sometimes they call it a "stencil" brush. Print this page and show the picture to the clerk.
For the detailed edges of lips, eye rims, and eyebrows, use an expensive artist's brush with a fine, pointed tip. Don't be fooled by the displays of cheaper brushes in craft stores. They look pointy, but when you flex the bristles to use the brush, they spread out. You can also use a good brush with a flat edge. Pay the extra money for some fine brushes for detail work.
Painting the Eyeballs
(If you use the Brose eyeball kits, you can ignore this procedure.)
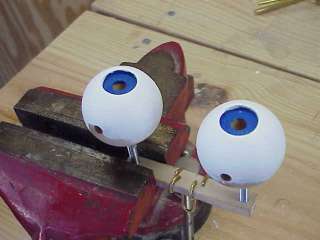
Apply one primer (Krylon spray Primer) coat to the eyeballs, and brush it on, don't spray it on. You don't want to be priming the centering springs.
The eyeballs are, of course, white unless you are making a very sick figure. You need to paint only the parts that are visible through the eye openings allowing for full eye movement in both directions.
Don't apply more than two coats of paint to the eyeballs if you are installing shell blinkers. Too much paint buildup could interfere with the shells' action.
I'm using blue transparent plastic irises for Fred, so I painted the countersunk iris holes deep blue to show through.
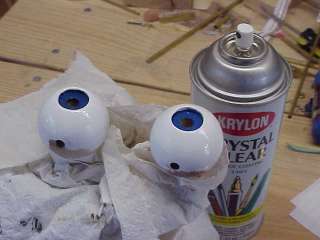
When the painted eyeballs are dry, spray them with Krylon Crystal Clear Acrylic Coating. This coating protects the eyeballs and gives them a shine that makes them look more real. Apply this coat before you insert the irises.
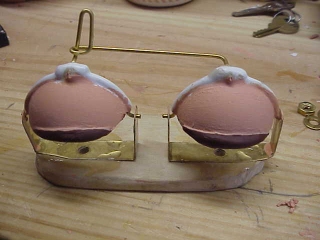
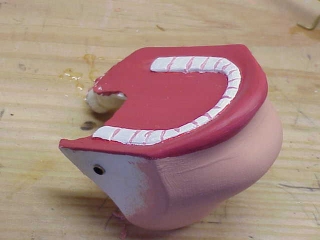
Paint the jaw, too, with flesh tone avoiding the lower lip area. You will probably need to do some touchup in the space where the lower lip meets the flesh tone of the jaw.
Some builders don't bother painting the trapdoor (the removeable back of the head) because it's hidden by the wig. I prefer to paint it.
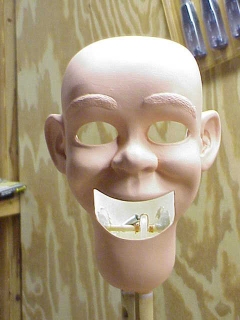
The eye rims need special attention. If you are not installing blinkers, just paint the rims all around the eye openings. If you are installing blinkers, paint the lower edges of the eye rims and up either side to where the blinkers' ridges will be visible when the eyes are open.
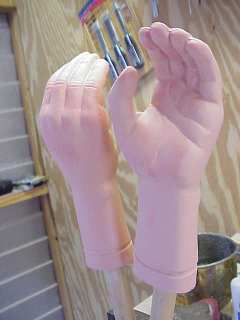
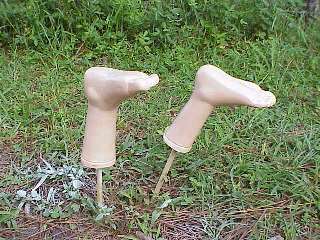
The more coats of paint you use on the hands and feet the better. Hands take a lot of punishment swinging around, banging on the surfaces on which you sit the figure, and so on. Feet, too, particularly if you change the shoes often.