Building a Precision Mouth Movement
by Al Stevens
al@alstevens.com
This document identifies a common issue with the fitting of jaws in ventriloquist figures, both professional figures and those built by amateur builders. I'll give some examples and then tell you how to address the issue when you build your own figure.
I call this subject an "issue" rather than a "problem." I have seen figures that have precision mouth movements and others that do not. Those that do are more interesting to me because it is more difficult to build a figure that way. Therefore, I designed a procedure to build a head with what I call a precision mouth movement. This document describes the procedure.
You should read this entire document before starting to build. If there is something you don't understand, something I left out, or something I got wrong, please let me know, and I'll update the document to make it clearer, more correct and more complete.
Jaws That Don't Fit
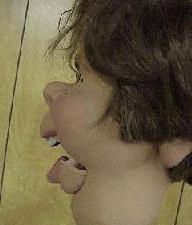
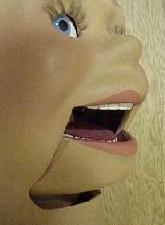
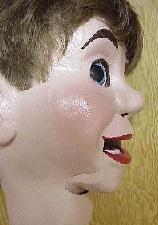
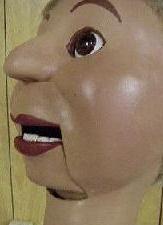
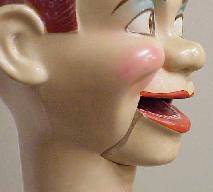
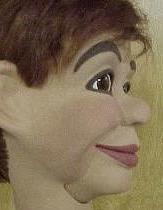
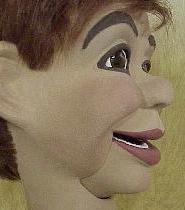
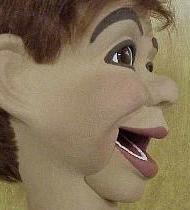
Look at the four pictures below. They all share a common characteristic: Their jaws, when open, do not fit their faces very well.
Two Jaw Characteristics
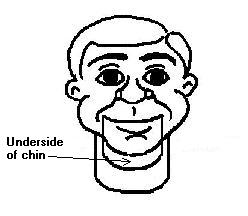
There are two noteworthy characteristics to these jaws when they open: The inside of the jaw and cheek are visible, and the neck below the chin exposes a gaping hole.
Visible Flat Sides
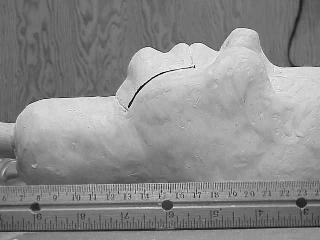
When such a figure's mouth is open, the flat side of the jaw is in view on some of them. (The jaw in the first picture above does not have a flat side. When you open its mouth you can see the teeth and daylight through the side of the face.) Juro Jerry Mahoneys have the flat side behavior as the following picture shows.
This picture is of an early Juro 32" headstick Jerry Mahoney, and its jaw fits really well compared to those that came later. Nonetheless, a good amount of the jaw's flat side is visible when the mouth opens. You see this same effect to a smaller degree in pictures of the original Jerry Mahoney.
A Gaping Neck Hole
The second jaw characteristic is also seen when the mouth opens. In many figures, when the ventriloquist opens the mouth, a gaping hole appears in the front of the neck below the jaw to receive the retracting bottom half of the jaw.
Marshall's Patch
Frank Marshall attached a leather rectangular patch to the front of the neck under the jaw to hide the hole that was evident when the ventriloquist opened the mouth. When the mouth opens, the patch wrinkles down as if it was a double chin. Early pictures of the original Jerry Mahoney seem to show such a leather patch. Max Terhune's Elmer Sneezewood in
Vent Haven
also has a leather patch on the neck.
Jerry Mahoney's Precision Jaw
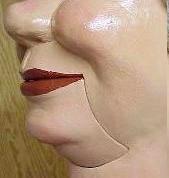
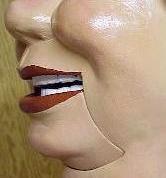
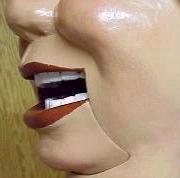
Eventually, Winchell made a new Jerry Mahoney that addressed this issue. The three pictures that follow are of a replica, which was cast from molds made from Winchell's newer Jerry. The pictures show Jerry's mouth in three positions.
Through the full travel of Jerry's mouth, the two vertical slots that separate Jerry's jaw from his cheeks have no gaps and expose none of the flat vertical side parts of the cheeks or jaw. As the lower underside of Jerry's chin retracts into his neck, no gaps appear and there is no need for a leather patch.
This well-fitting precision jaw behavior is common among more contemporary figures.
The procedure for building one is not complicated and requires mostly lots of patience and a steadfast willingness to undo and redo things until everything fits.
Start With the Head
The procedure for building a precision jaw is the same whether you are sculpting a clay model to cast or carving the head from basswood. The difference is you reshape a clay model as you go along. For a carved head you add wood filler to parts of the face, carve away other parts of the face, and resand as you fit the jaw. The secret to minimizing all this resculpting effort is to plan ahead.
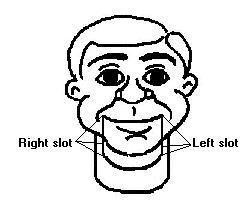
You have these objectives:
- The right and left slots will be exactly parallel.
- Each slot will describe an arc when the face is viewed in profile.
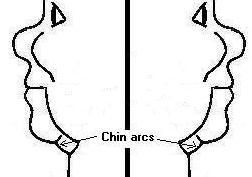
- The lower half of the jaw under the chin will describe a larger concentric outer arc that fits precisely into the bottom part of the jaw opening as the mouth moves up and down.
- All three arcs will have a common center point to identify a correct position for the axle that pivots the jaw.
Tools
- A compass--not the kind for navigating, but the kind for drawing circles
- A straight edge ruler that shows measurements in millimeters
- A digital camera and tripod
- A computer and printer to print your digital pictures
- Digital image processing software. I use
Paint Shop Pro.
Building the Head and Marking the Jaw
- Carve or sculpt the head.
- Try to make the two sides of the cheeks where the vertical slots will go as rounded as possible, keeping in mind your objectives.
- Try to make the underside of the jaw rounded, too.
Slots
- Using a dark marker, draw vertical lines on the face where you expect to cut out the jaw slots. These lines must appear straight when viewing them from directly in front of the face. You can use a felt tip marker to draw the lines on a clay face.
- Using your compass, ensure that the distance between the two slot lines is constant all the way from the mouth down to the neck. Set the compass so its points reach the right and left edges of the mouth at the ends of the lips. Lower the compass to the neck to ensure that the slots are parallel. The slightest variance in these two measurements will result in non-parallel slots and a jaw that jams when you open and close the mouth.
Arced Slots and Chin
- Visually inspect both slots from profile views to see if they describe an arc, which is a segment of a circle.
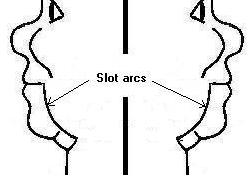
- Resculpt the cheeks, redraw the slot lines, and reinspect them until they look like true arcs.
- Visually inspect the under half of the chin to ensure that it, too describes an arc when viewed from the two profile views. The under chin arc should have the same center point as the slot arcs and a longer radius.
- I'll explain how to determine and adjust center point and radius later. For now, use your eye and get it as close as you can.
- Visually inspect the underside of the chin from a full front view. The curve it defines should also be an arc. Once again, be as precise as you can by using your eye. Get it as close as you can. We'll use a more scientific approach in the next procedure to refine these arcs.
Profile Pictures
- Place the head horizontally on a table (prop up the neck if you have to) and place a ruler alongside the head.
- Take digital pictures of both profiles with both pictures showing the ruler. The ruler should extend the full width of the picture.
- Take the picture from as far away as possible. Use a tripod and a camera with a zoom lens. This technique prevents the ruler from being too big in relation to the head because of image perspective.
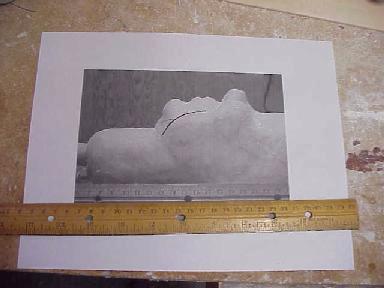
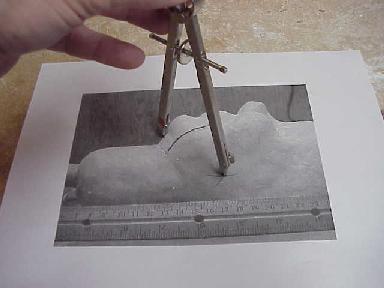
- Following is a picture of the left profile of the clay model for the head of the figure I built by using this procedure.
- Use digital imaging software (Paint Shop Pro, for example) to print the two pictures in a format that renders the images as life-size as possible. Use the ruler in the pictures to achieve this effect. Most such software programs permit you to change the size of a printed picture to precise heights and widths. Use the millimeter increments on the ruler in the picture to see how wide to print it. Ensure that the software maintains the picture's aspect ratio when you change the width (which means the software automatically adjusts the height appropriately).
- Use the real ruler against the printed ruler to ensure that both printed pictures render the head life-size.
Refining the Arc and Locating the Axle Position
Using the compass, find the center point and radius of the arc that the slot line defines in the profile view.
In the sketch below, 'A' is the arc defined by the left slot in the left profile view.
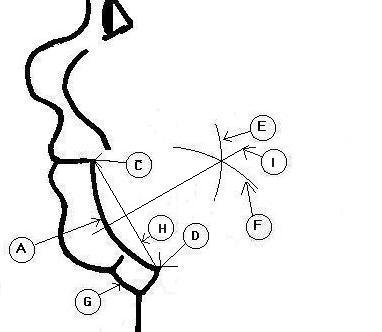
- Set the compass so its two points touch 'C', the mouth (upper) end of the arc, and 'D', the neck (lower) end of the arc.
- With this compass setting, place the compass point on 'C' and draw arc 'E'.
- Place the compass point on 'D' and draw arc 'F'.
- Draw line H to connect points C and D.
- Measure line H and locate its midway point.
- Draw line I to intersect the midway point of line H and the point where arcs E and F intersect.
- Somewhere along line I is the arc's center point, which is where the jaw axle will be located. To find the center point, use this procedure.
- Visually locate what appears to be the center point.
- Iterate the following procedure until the center point is an equal distance from points C and from the point where line I intersects arc A. This distance should also be equal to the distance from the center point to point D.
- Set the compass with one compass point on the approximate center point and the other compass point on point C.
- Rotate the compass around the approximate center point so that its other point touches line I.
- If the compass point touches line I outside arc A, move the approximate center point further from arc A a distance equal to one half the distance between arc A and where the compass point touches line I.
- If the compass point touches line I inside arc A, move the approximate center point closer to arc A a distance equal to one half the distance between arc A and where the compass point touches line I.
- Clearly mark the center point on the picture. The axle upon which the jaw pivots goes at this point.
- Set the compass so one point touches the center point and the other point touches where line I intersects arc 'A'. The compass is now set to the radius of the arc.
- Make a note of the radius of the arc (the distance between the two points of the compass). You will use this value later.
- Use your compass, still set to the radius, to see if the curve described by the marked slot is a true arc.
- Put the compass's pencil point on arc 'A' and the other point on the center point.
- Trace the arc with the compass from 'C' to 'D'.
- If the compass's pencil point stays on the arc, the arc is true.
- If the slot curve's arc is not true:
- Reform that side of the face by adding or removing clay (or wood).
- Redraw the slot line on the face.
- Take another picture of the profile along with the ruler.
- Repeat this procedure until you get a true arc.
(Remember, you are not trying to "draw" a perfect arc on the paper. You are trying to sculpt a face with slots that render in a flat picture perfect arcs in profile when you trace them with the compass.)
Do the Other Side
- Place the picture with the other profile picture back to back. Hold them up to the light and line them up so the profiles (brow, nose, chin, etc) line up.
- Mark the center point of the arc on the other profile exactly opposite to the one you just marked on the first profile.
- Repeat the procedure with the second profile, except now you have a fixed center point and radius to work with.
- Resculpt the other cheek, remark its slot, and take more pictures until the slot line in profile describes an arc of the known radius from the known center point of the opposing profile.
Under the Chin
- Use a similar procedure to ensure that arc 'G' in the picture above is also a true arc with a greater radius than the slots but with the same center point.
- Try also to ensure that the curve described by the underside of the chin from cheek to cheek is constant and is the same shape as the bottom curved slot of the jaw.
- The following sketch shows how the action will fit the slots and neck in the open and closed positions.
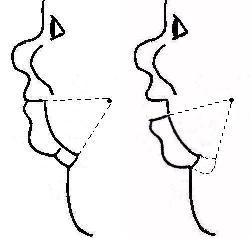
- Note that by using a different segment of a circle as the arc (from lower on the circle, for example) and a different radius (longer, shorter) and, consequently, the position of the axle, you can alter the effect of the open mouth and change the extent to which the underside of the chin looks like a double chin.
Fitting the Axle to the Jaw
- After all the arcs are properly sculpted on the head, either cast the head if you are using a clay model, or complete carving and sanding the rest of the face.
- Set the compass to the width of the mouth and use it to draw lines where you will cut vertical jaw slots in the completed head.
- Once again, ensure that these slot lines are parallel.
- Cut out the jaw.
- Sculpt the tongue and lower teeth as one flat piece that you will glue to the jaw just behind the lower lip, but do not attach it yet.
- Set the compass to the radius of the slot arcs.
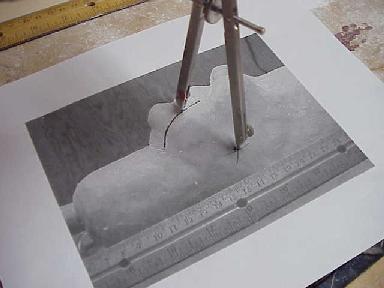
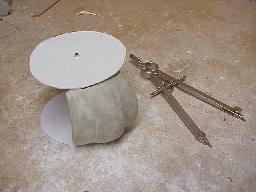
- On a piece of medium cardboard (a cereal box works well) use the compass to draw two discs with a radius the same as the slot arcs.
- Cut out the discs and punch a small hole in the center of each.
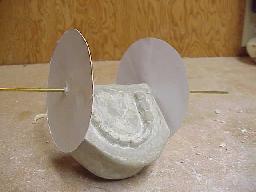
- Align the discs with the slot arcs and temporarily attach them to the jaw as shown here.
- The holes in the discs define where the axle goes. Attach the tongue/upper teeth piece to the jaw and use the disc holes to fit the axle mechanism to the jaw. I permanently mount a brass sleeve into the back of the jaw and use a brass rod through the sleeve. The two ends of the rod are to be permanently attached to the inside of the cheeks, and the jaw freely pivots on the rod.
Installing the Jaw
- Remove the discs, trim the axle to fit inside the head, and insert the jaw into its place in the face from behind.
- Form temporary fasteners for the two ends of the axle on the inside of the head on both inner cheeks so the mouth fits correctly in the closed position. A touch of casting medium or wood filler will do. Make the fasteners such that you can remove the jaw later without losing the position of the fasteners.
- The mouth should freely open and close without falling out. You do not permanently install the jaw at this time because you will paint it when it is outside the head.
(If you are really lucky, everything fits properly. That seldom happens.)
Refining the Slot Fits
- When the mouth is closed, the slots should be properly aligned. That's because you sculpted the head as one unit and cut the jaw out of the sculpted face.
- If cutting out the jaw has left wide gaps in the slots, you can use filler on the jaw and inside the cheeks to close the gaps. Make sure you keep the sides flat so the mouth action does not bind. Do not make the slots too thin. You'll need some space to add primer and paint later.
- Open the mouth.
- If the mouth will not open, it is probably because the underside of the chin protrudes too far and blocks the movement when it tries to retract into the head. It should be obvious where the protrusions are when you observe the movement. Sand the underside of the chin until the mouth fully opens. Don't worry about chin precision yet. Just get the mouth to fully open and close.
- When the mouth is open, you might see some part of the side of the jaw or some part of the inside of the cheek exposed at the bottom half of the slot. Both these flat surfaces are out of sight in all mouth positions on a figure with a well-fitting jaw.
- Sand down whichever part (jaw or cheek) protrudes with the mouth open until the two parts are flush. Do not sand the other part, only the protruding part. Do this on both sides.
- Close the mouth. Now whichever parts (jaw or cheek) you sanded will be indented at the upper half of the slots and the other part (cheek or jaw) will protrude.
- Sand the only parts that protrude.
- Use this procedure iteratively and at several mouth positions until both slots have a precision circular fit.
Fitting the Chin
- As the mouth opens and closes, observe how the underside of the chin retracts. When closed there should be no gap. While opening, the mechanism might reveal a gap.
- Add filler to the underside of the chin and, while the filler is still pliable, open the mouth. Let the horizontal curved slot in the neck shape the filler as the mouth opens.
- Each time you do this, you'll have to clean the excess filler off the neck opening and smooth the filler on the underside of the chin.
- You might need to modify the horizontal curved slot by carving and filling around it so it describes the proper arched opening to receive the underside of the chin.
When You Paint the Head
- Remove the jaw from the head, and prime the head and jaw separately.
- When the primer is dry, temporarily insert the mouth in the head and ensure that it still moves freely up and down.
- If the jaw now binds, sand the sides of the jaw and/or the inside cheek, reprime, and try again.
- Paint the inside of the mouth and the tongue and teeth before installing the jaw.
- When the paint is dry, install the jaw and ensure that the mouth still works properly.
- If the jaw now binds, sand the sides of the jaw and/or the inside cheek, reprime, repaint, and try again.
That's it. It takes a lot of patience and a willingness to undo things you thought were finished in order to redo them. Following are three pictures of the figure I built by using the procedures this document describes.
Please send comments and questions to al@alstevens.com