Eyes
by Al Stevens
al@alstevens.com
This section explains the moving eye assembly. The assembly is mounted on a platform that slides into the back of Fred's head and rests on the small shelves on either inside wall.
Page 132 in Figure Making Can Be Fun has a lot of detail about eyes and eye mechanisms.
You can build eyeballs as described here or you can purchase the
Pro Vent Figure Eyeballs.
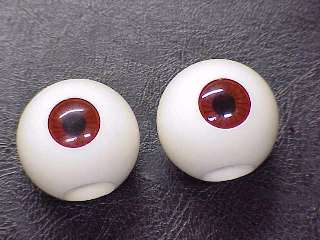
These eyeballs come complete with irises. If you decide to use these eyeballs, you can ignore the eyeball building and painting instructions.
You need to pay attention to precision in this procedure. Proper drilling and alignment of the eyeballs is essential to their correct operation. Consequently, when I say "exactly" in this procedure, do exactly as I say with respect to dimensions. When I say "about," or don't say "exactly," you have some latitude.
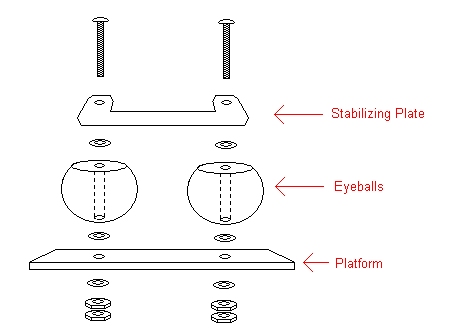
The Eye Assembly
Following is an exploded view of the eye assembly. It uses 2" 10-32 brass bolts, six brass washers, four 10-32 brass nuts, a platform made from 1/4" (exactly) thick basswood, and a stabilizing plate made from sheet brass.
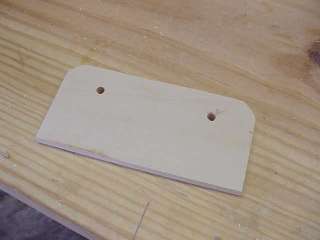
The Platform
The platform is a piece of 1/4" thick basswood.
- Cut rectangle about 4 1/4" long by about 2" wide.
- Round off the front corners.
- Insert the platform into the head and ensure that there is a small amount of side-to-side play.
- Drill two 3/16" holes in the platform for the eyeball axles. These holes must be exactly 61 mm apart, center to center, and approximately 7/8" from either end of the platform. They are set back about 1/2" from the front edge of the platform.
Eyeballs
The eyeballs are two 1 1/2" diameter doll heads. These heads have flat tops (from our perspective for eyeballs; when they are used as doll heads, the flat part is on the bottom) and holes that do not go completely through the ball.
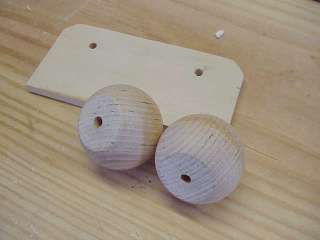
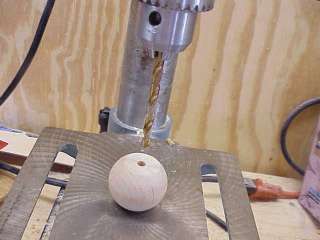
You must redrill the holes with a 13/64" drill bit to enlarge them and to drill the hole completely through the sphere. These holes are for the eyeball's axles.
To ensure that the holes you drill are accurate:
- Set up your drill press so that the bit descends exactly through the center of the hole in its platform base.
- Hold the sphere in in the hole with one hand while you line up the drill bit to enter the hole exactly at the center of the ball.
- Keep holding that sphere tightly while you run the drill and lower the bit all the way through the existing hole and further down through the ball.
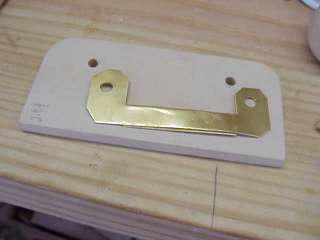
Stabilizing Plate
- Cut the stabilizing plate from sheet brass in the shape shown in the following picture. The plate is 3" x 1".
- Form the tabs by cutting slits 3/8" long and bending the center part back and under the plate.
- Drill two 13/64" holes in the stabilizing plate's tabs. These holes must align exactly with the axle holes in the platform, which means they must be exactly 61 mm apart, center to center.
As shown, the stabilizing plate is not complete, just complete enough to check the assembly's alignment. You'll be bending it when you make the synchro bar in the next procedure.
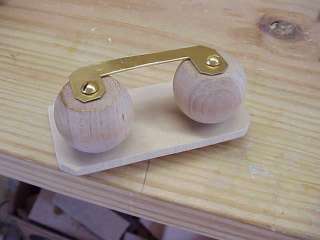
Initial Assembly
Put all the pieces together as shown in the exploded drawing at the top of this page. Don't tighten the nuts. You'll be disassembling and reassembling this component many times before you are finished. Just draw the nuts up tight enough so that the spheres rotate but there is no wobble or up and down play in them.
Slide the assembly into the head and ensure that the eyes are correctly positioned in the eye openings and that each eye rotates without binding . If not, you've made an error in a measurement somewhere, and this is the time to correct it. A common error is incorrect drilling of the holes, either in the spheres or in the platform. If that's what happened, you'll have to dismantle the assembly and redo something.
Some head castings have a slight error in the placement of one of the side shelves. If either eye is too low in the eye socket, build up the shelf with Apoxie Sculpt to achieve the correct positioning of the assembly.
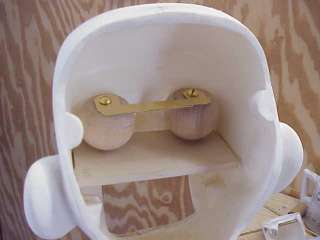
Here's Fred with the beginnings of a set of moving eyes. He has a bit of a blank stare, doesn't he? You'll take care of that in the next two procedures.