Synchronizer Assembly
by Al Stevens
al@alstevens.com
The synchronizer assembly is the component of the moving eye assembly that keeps both eyes coordinated (looking in the same direction) and, in this project, automatically centers the eyes when you release the eye movement control knob on the headstick.
Page 136 in Figure Making Can Be Fun is a discussion of various synchronizer configurations. I chose the one described beginning on page 141, Self-centering mechanism #2, to combine synchronization and self-centering.
During this procedure you will dismantle and reassemble the eye assembly several times. I assume it will be obvious when you have to do this.
Building the Synchronizer
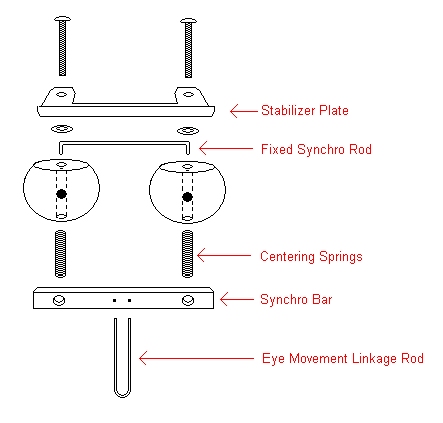
The synchronizer is made from two lengths of 1/16" brass rod, two stiff expansion springs, and a length of 1/4" basswood. The following diagram shows the eye assembly exploded view with the synchronizer pieces in place.
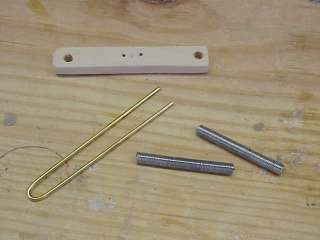
- Cut out a piece of 1/4" basswood 3" x 1/2". This piece is the synchro bar.
- Drill holes at either end of the synchro bar. These holes must be the diameter of the expansion springs. The holes must be exactly 61 mm apart when measured from their centers.
- Drill two 1/16" holes through the synchro bar 3/8" apart. These holes are centered on the synchro bar relative to the outer holes.
- Cut the centering springs to a length of 1 1/2" each.
- Cut a 4" length of 1/16" brass rod. Bend the rod into a U shape 3/8" wide. This rod is the eye movement linkage rod that receives the eye control linkage described in Installing Mechanics.
- Insert the centering springs into the outer holes of the synchro bar. Push them in until the ends are flush with the opposite side of the synchro bar,
- Insert the two ends of the eye movement linkage rod into the two inner holes of the synchro bar from the side opposite where the springs are inserted.
- Push it through until only 7/8" of the loop extends from the synchro bar.
- Wrap the two ends of the rod around the synchro bar to hold it in place.

Drilling the Eyeballs for the Synchronizer
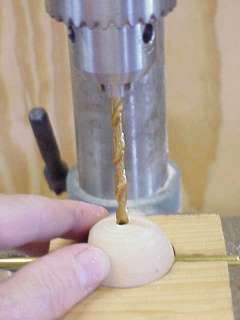
Drill holes 1/4" deep into the backs of the two eyeball spheres to receive the centering springs. These holes are the same diameter as the outer holes on the synchro bar.
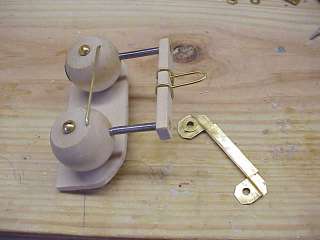
I built a jig to help get the spring holes at a right angle to the axle holes in the eyeball. The jig, shown here, has a 1 1/2" hole drilled out and a notch scribed on a line representing the axle. I ran a brass rod through the axle hole and placed the sphere into the jig. The rod holds the sphere in place on the drill press's platform.

Fixed Synchro Rod
Using only the spring mechanism for synchronization sometimes causes the eyes to turn at different rotational rates making for an odd, visually dysfunctional effect in the character like someone who is visually impaired in one eye. To eliminate this effect, install a fixed synchro rod.
- Modify the stabilizer plate to make room for the fixed synchro rod and to hold the rod in place. Bend the stabilizer plate into the shape shown in the following picture. It's easiest to do these two bends with a bench vise.
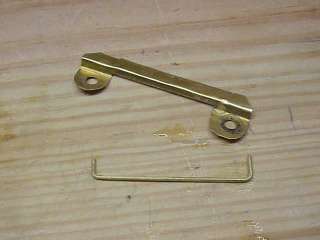
- Cut a 3" length of 1/16" brass rod as shown in the preceding picture.
- Bend the ends down so that the bends are of equal length and exactly 61 mm apart. This rod is the fixed synchro rod.
- Drill 1/16" holes in the tops of both eyeballs directly behind the axle holes and toward the rim of the flattened side.
Installing the Synchro Bar and Rod
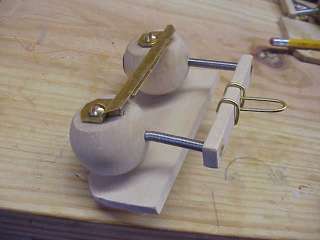
- Insert the fixed synchro rod as shown in the next picture into the holes you drilled into the eyeball tops.
- Insert the centering springs into the holes you drilled in the backs of the eyeballs.
- Use two-part epoxy glue and glue the springs into the synchro bar and into the backs of the eyeballs. Do not glue the fixed synchro rod.
- Install the stabilizer bar so that the raised edge keeps the fixed synchro rod in place inserted into the eye tops. This assembly is Fred's moving eye assembly synchronized and self-centering.
If you're like me, you'll sit and play with this mechanism all day long. You'll see right away how the mechanism synchronizes the eye movement and the expansion springs always return the eyeballs to the same location when you move and release the synchro bar. Okay, now, put it down and get on with the project.