Preparation
by Al Stevens
al@alstevens.com
Okay, you have all the materials and tools, and you think you are ready to go. Maybe so, maybe not. There's some preparation involved before you can start building, and this page describes those steps
Preparing Yourself
First, prepare yourself. This project takes time, effort, patience, and skill with hand tools. Read the entire web site before you start. Read each procedure from beginning to end before starting, and don't start until you understand the procedure. If something is unclear, don't start until you clear it up. Ask questions when you are unsure.
Deal with your doubts now. You can do it. It looks complicated at first, but if you apply yourself, be patient, take your time and are willing to make and correct mistakes, you can make a really nice professional figure from these kits.
Preparing Your Workspaces
You'll have three workspaces. They might be the same space or they might be different spaces. But depending on what you are doing, these three workspaces have different requirements. If you are working with limited space you might want to schedule the project to minimize the number of times you have reconfigure your surroundings to suit the current task.
The Construction Workshop
This is where you do all the sawing, carving, sanding, drilling, gluing, and assembly. You'll even use it for a barbershop. This space gets dirty. You should clean it after each work session. You probably won't but you should. You'll spend most of your time here. The work surface should be at a height to permit you the maximum comfort as you work. You need a stool to sit on, too. Your tools should be readily accessible and well organized.
Yeah, right. Having said that, I wouldn't want you to see my workspace when I'm in the middle of a project. I've seen the spaces of other figure makers too, amateur and professional, and none of them are the kind of orderly, clean space I describe here. But at least I said it.
You absolutely need a pair of safety glasses. Sawing, drilling, and sanding kicks up a lot of flying fragments that can injure your eyes. Don't even think about working without eye protection.
The Fred project does not involve using any hazardous materials, so you won't need a respirator mask or anything exotic like that. But surgical masks are a good thing to have when you do a lot of sanding.
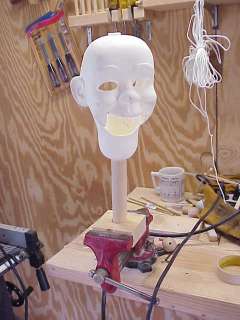
You need a place to hold the head while you are working on its components. You shouldn't just throw it down anywhere. I built a simple headstick holder. It's just a block of wood with a hole slightly larger than the diameter of the headstick. Sometimes it's in the vice as shown here, but mostly it's clamped to the workbench because I use the vice for other things.
The Paint Room
You need a clean environment for painting. It won't stay clean and neither will you, but it should be free of sawdust and anything else that might float around in the air and light on a freshly painted surface. Painting outdoors is not always a good idea either if the pollen is thick.
The Sewing Center
You'll use the sewing workspace to alter the clothes, make the arms and legs, and fit the wig.
You need a flat cutting surface, a tape measure, a good pair of scissors, and, of course, a sewing machine (unless you are willing to do a lot of hand stitching).
If you're lucky someone in the household is a good tailor or seamstress and has the necessary equipment and space for cutting and sewing.
She might not want to help you with your project, but if you're nice to her she might let you use her sewing room and equipment. Maybe she'll even thread a needle or two for you. (End of gender-insensitive observations.)
The sewing workspace needs to be clean. Sewing in a dirty, dusty workshop is not a good idea.
Preparing the Head, Hands and Feet
- Read the printed instructions that accompany the kit to see how to prepare the parts.
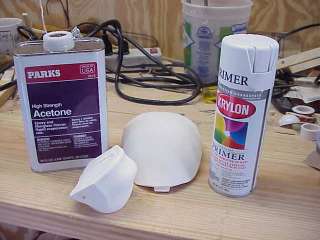
- Clean the head, jaw, trapdoor, hands and feet with acetone or odorless mineral spirits. Clean the head inside and out.
- Sand the parts lightly
- Using the instructions as a guide, make the modifications to the head and trapdoor to install permanent trapdoor attachment screws. This procedure involves drilling into the head's tabs and the trapdoor's inserts. All that drilling into the casting medium makes a mess. Do it now instead of after you've installed mechanics or done any painting.
- Sand the hands and feet to remove the seam made when the two parts of the cast were joined.
This isn't the last time you'll clean the parts. All that handling in your workshop during construction is going to get Fred looking really grungy. This cleaning process removes residual mold release. Later you'll have to remove dirt.
Who Is He?
Before you go any further, give your figure a name. It doesn't have to be the name of the character that the figure will eventually become, but he needs a name. You'll be talking to him a lot as you work. (You should probably isolate your workspace from any children, because some of the things you will be yelling, er, saying to him and to yourself are best said in the privacy of your own workshop.) Later, when the figure has mechanics, he will talk back. He needs a name. Show me a figure maker who does not talk to his figures when working on them, and I'll show you someone who is too sane, rational, and downright boring to be a figure maker.
I named this figure Fred because that's the name that Mike's wife gave the product and that's the name I like for this guy.