Raising Eyebrows
by Al Stevens
al@alstevens.com
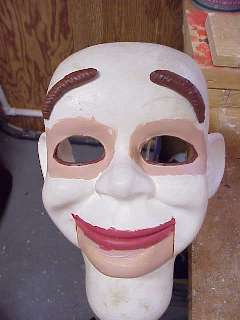
Fred doesn't have raising eyebrows, but I have installed that feature on Fred figures as an option. The following procedure describes how to to that.
Page 142 in Figure Making Can Be Fun has a discussion of eyebrows. My approach is similar to but different from the design presented in the book. The main differences are:
- I use a brass rod and lever mechanism rather than strings and dual pulleys to pull the eyebrows up
- The inner mechanism is close to the face rather than toward the rear, which lets me use a single axle for the internal levers for eyebrows and blinkers.
- I insert the rods through the forehead at an inward and downward pointing angle to permit the eyebrows to more closely follow the curvature of the brow when they raise.
Raising eyebrows are tricky to install, and the feature has disadvantages. First, you rarely use the feature, although some ventriloquists overuse it. Second, the feature can be fragile, which means you have to pack and handle the figure very carefully to keep the eyebrows from being damaged. Finally, the feature does not show well in close-up performances. The external mechanism is obvious and usually unattractive when viewed closely. Consequently, a figure with this feature is best used in a venue that does not place you close to the audience.
Those problems notwithstanding, many ventriloquists like raising eyebrows, so here's how you add the feature to Fred.
Eyebrow Frames
Eyebrow frames are built from 1/16" brass rods. Later you will mold eyebrows and glue them to the frames. First, however, you must get the frames installed.
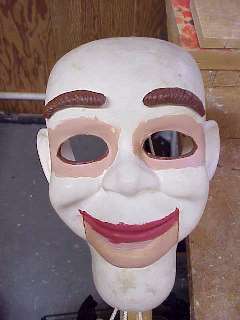
- Sand the sculpted eyebrows from Fred's face.
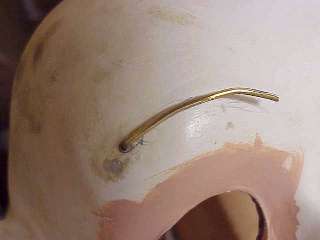
- Drill 3/32" holes into the forehead where the outer ends of the eyebrows will be.
This hole must point inward toward the center of the face and slightly downward so the eyebrows follow the curvature of the brow when the eyebrows raise. You might have to experiment. If you make a mistake, fill the hole with
MagicSculp or
Apoxie Sculpt
and start over when the casting medium sets.
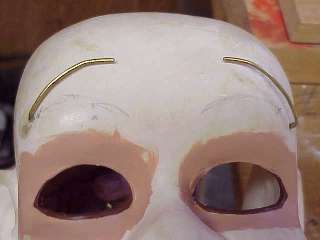
- Cut two 1/2" lengths of 3/32" brass tube
- Insert the tubes into the holes flush with the face.
- Cut two lengths of 1/16" brass rod approximately 5 inches in length
- Bend the rods to rougly form the eyebrows
- Insert the rods into the tubes and observe the eyebrows in raised and lowered position.
- Remove and rebend the rods until the eyebrows are naturally formed.
- Ensure that the rods do not scrape the face.
Here is where you find out if the angle of the tubes is correct and whether you have to remove them and redrill the holes.
- Remove the frames from the face.
- Secure the tubes to the inside of the face with glue or casting medium.
- Wait for the glue or casting medium to set up.
- Put the frames back into the face.
- With the frames in their normal, lowered position, bend the brass rod inside the face so that they point at each other.
- Bend the ends of the inner frames into oval loops.
- Attach the two loops with a spring. This spring returns the eyebrows to their normal lowered position.
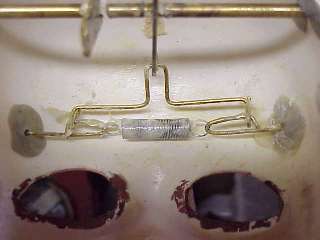
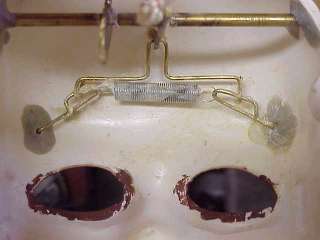
- Cut a lever from sheet brass. It must reach forward to just above the spring and back to where the string comes up.
- Drill three holes in the lever, a 1/16" hole on the foreward and, a hole in the center for the axle, and one at the rear end for the string.
- Bend a length of 1/16" rod into a fitting that attaches to the loops and that has a U-shaped bend to attach to the lever. You must bend the rod after inserting it into the end of the lever.
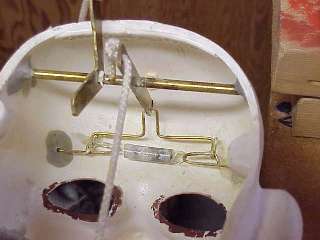
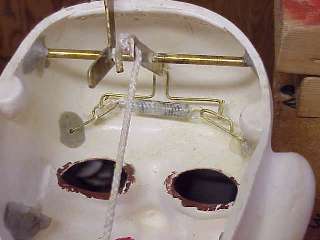
The L-shaped lever to the left of the eyebrow lever in these pictures is for the blinkers, which are not yet installed in this figure. The lever is pushed up to let you see the eyebrow mechanism.
- Install the lever on the axle that supports blinkers.
- Attach the string to the lever and run it down through the neck to a lever on the headstick.
Making the Eyebrows
The actual eyebrows on the face are sculpted from
MagicSculp or
Apoxie Sculpt.
First you must prepare the head.
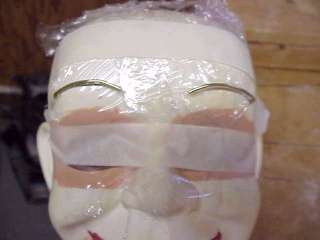
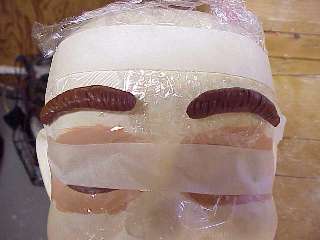
- Wrap some Saran Wrap around the face and over the eyebrow frames.
- Use masking tape to hold the Saran Wrap in place.
Next, you sculpt the eyebrows.
- Form the eyebrows over the Saran Wrap covered frames with the casting medium.
- Leave space between the cast eyebrows and the brow to permit the eyebrows to raise and lower.
By casting the eyebrows this way, you ensure that they fit the frames later when you install them permanently.
The Saran Wrap prevents the cast eyebrows from prematurely adhering to the frames.
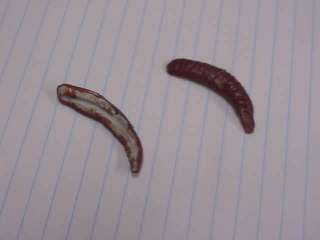
- When the eyebrows have set up, remove them from the frames.
- Paint the eyebrows sometime before you install them permanently on the frames.
- Put a small length of masking tape on the backs of the eyebrows to temporarily hold them on the frames.
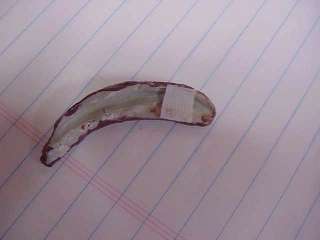
- Raise and lower the eyebrows to ensure that they look and operate properly, adjusting the vertical bend of the frames accordingly
- After the face is painted, you can glue the eyebrows to the frames.