Torso
by Al Stevens
al@alstevens.com
The torso is the body without arms and legs. You'll learn to build them later.
You can buy a prefabricated torso or build your own. When I built Fred for this project, prefabricated torsos were not available. Now they are.
Buying a Prefabricated Torso
Here's a picture of the prefabricated torso available from
Puppets and Props.
If you buy one of these, you don't need to read further on this page and can proceed to read about how to build
Arms and Legs .

Building Your Own Torso
Fred's torso is made of wood. The seat and shoulders are made from 1x6 pine shelving, which is actually 3/4" thick. You'll need at least a three foot length.
Chapter 8. Painting and Body Construction in Figure Making Can Be Fun explains several options for building figure bodies. The Fred project uses body style 3 shown on page 168 and the seat and shoulder patterns on pages 175 and 176.
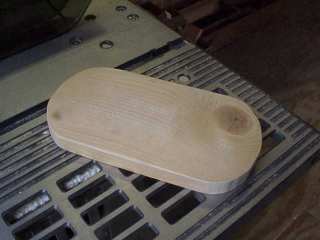
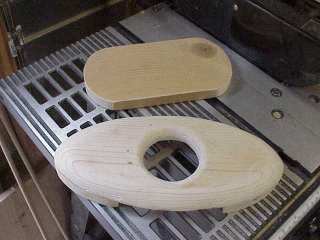
The Seat Piece
- Cut the seat from the shelving as an oval 4 1/2 " wide by 9 " long.
- Sand the edges of the seat.
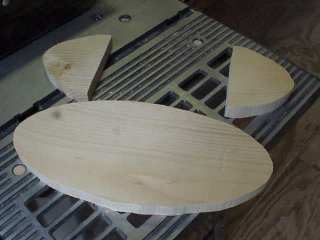
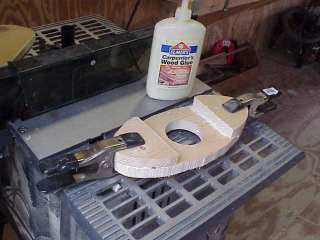
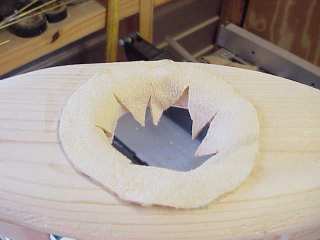
The Shoulder Piece
- Cut out two pieces using shoulder pattern as ovals 5" wide by 11" long.
- Cut the ends off one oval. The ends are 3" long.
- Discard the middle part of the oval from which you cut the ends.
- Cut out the neck socket as a 2 /12" diameter circle in the center of the shoulder oval.
- Position the ends on the ends of the shoulder oval.
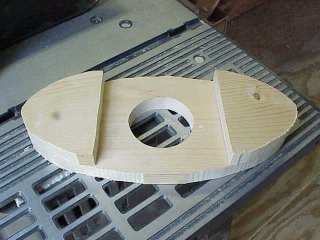
- Glue the ends in place.
- Clamp the glued ends until the glue sets.
- Round the shoulder piece with a wood rasp.
- Round the neck socket with a wood rasp.
- Sand the shoulder piece smooth.
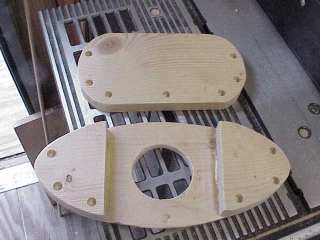
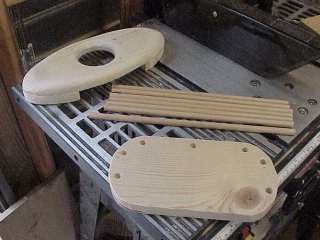
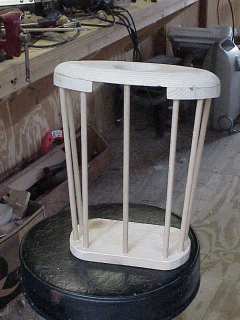
The Rib Cage
Fred's rib cage is made from 3/8" dowels. See the note at the end of this page about the number of ribs.
- Drill seven 3/8" holes in the shoulder piece. Don't drill all the way through.
- Drill seven corresponding 3/8" holes in the seat. Don't drill all the way through.
- Cut the torso's seven ribs from 3/8 " dowel
- cut six 11 1/4" lengths of 3/8" dowel.
- cut one 12 1/4" length of 3/8" dowel.
- Put carpenter's glue in the holes in the seat.
- Insert the longer dowel into the center front hole of the seat.
- Insert the other dowels into the other holes of the seat.
- Put carpenter's glue in the holes in the shoulder piece.
- Fit the shoulder piece onto the tops of the seven dowels.
- Tap the shoulder piece into place with a mallot.
- Ensure that the torso is symmetrical.
- Put the torso aside for the glue to set.
Lining the Neck Socket
The neck socket has a lining of chamois cloth to reduce friction, which can wear the neck paint, and noise, which would distract from the performance, when you move the head.
- Cut a circle of chamois cloth 4" in diameter.
- Cut slits in the center of the circle to form an opening for the headstick.
- Glue the circle to the shoulder piece.
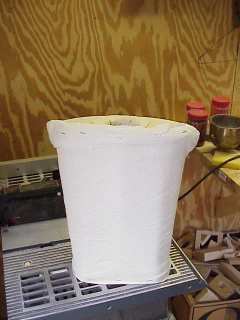
Padding the Torso
- Cut out a piece of cotton batting the height of the exposed dowel ribs and long enough to wrap completely around the front and sides of the torso.
- Cut out a piece of muslin batting wide enough to reach around the ribs past the rear two ribs and about 12" tall.
- Wrap the cotton batting around the torso.
- Wrap the muslin over the batting.
- Staple the muslin to the shoulder piece at the top and seat edges at the bottom.
- Put a bead of glue down both rear ribs.
- Stretch the muslin over the glued ribs and clamp it with clothespins.
- When the glue sets, remove the clothespins.
- Sew a stitch up the muslin behind the ribs to secure the muslin.
- Trim the excess muslin.
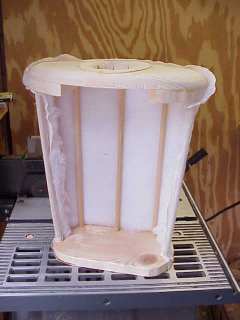
There's more padding to be added to the torso, specifically the shoulder and seat padding. You'll do that after you add the arms and legs in the next procedure.
Note: Two More Ribs?
If Fred is going to wear only a sweater or thin shirt you might want to add two more ribs on either side of the back. As I built him, he might look to thin in profile if he is wearing a turtleneck shirt, for example.
The Headstick Lock
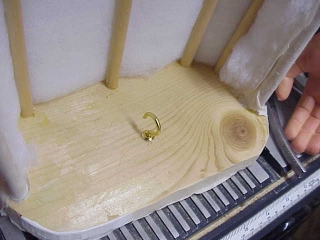
Install a large cup hook in the seat piece at about its center. You can attach a large rubber band later for a headstick lock that connects to the cup hook at the base of the headstick.